Inserting Commands
These commands allow you to insert common web document elements such as images, background images and hyperlinks. You can also insert items such as horizontal lines and emoticons.
Below is a list of all inserting commands along with descriptions and icons.
- Hyperlink, Bookmark, Horizontal Rule
- Image, Background Image, Video, Insert File
- Special Characters, Emoticons
- Layout, Layer, Page Break
- Block Quote
- Template
|
|
Creates hyperlinks which connect to other web documents. Hyperlinks are tags which are applied to words, phrases, pictures or other elements of a web document. When the user clicks on an element with hyperlink tags, they are moved to another web document or another location in the same web document, or they can download files or connect to programs.
You can click the ![]() () button to insert text with a hyperlink, or you can select existing text and click the hyperlink button to apply hyperlink tags to that text.
() button to insert text with a hyperlink, or you can select existing text and click the hyperlink button to apply hyperlink tags to that text.
If you click the hyperlink button while nothing is selected in the editing window, the following panel will appear.


Link Type
Select from one of the following link types.
URL: Link to a location specified by a URL.
Bookmark: Link to a location specified by a bookmark. To create a bookmark link, you must have already inserted a bookmark in the document.
Address
Set the location (URL) of the file to which the hyperlink connects.
Text
The text to which the hyperlink tags will be applied. When you click , the text will be automatically inserted and appear in the editing window.
Title
Enter the title of the linked location.
Target Frame
Specify in which frame the target document will appear. You can enter the name of the frame directly or choose from one of the options below.
|
_blank |
Open the link in a new browser window. |
|
_parent |
Open the link within the parent frame. |
|
_self |
Open the link within the current frame. |
|
_top |
Open the link in the full browser window. |
Bookmark Name
If the Link Type is set as Bookmark, you can select the name of the bookmark to link to.
![]() If you pre-select the text or image that the hyperlink will be applied to before clicking the
If you pre-select the text or image that the hyperlink will be applied to before clicking the ![]() (Hyperlink) button, the Text option is disabled.
(Hyperlink) button, the Text option is disabled.
|
|
Bookmarks allow you to link to specific locations within a document. They are useful when linking to part of a lengthy document. After you create a bookmark, you can create a hyperlink which links to it.
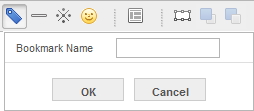
To create a bookmark, place the cursor where you want to insert the bookmark, and click the ![]() (Bookmark) button. Enter the name of the bookmark and click OK.
(Bookmark) button. Enter the name of the bookmark and click OK.
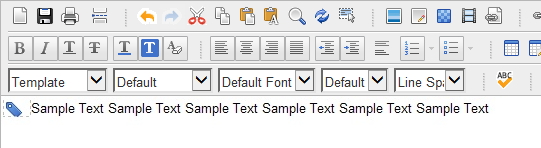
The location where the bookmark has been inserted will be marked with a bookmark icon as shown below.
![]() Once you have inserted the bookmark, you can link to it with a hyperlink. To do so, click the
Once you have inserted the bookmark, you can link to it with a hyperlink. To do so, click the ![]() (Hyperlink) button and select Bookmark as the Link Type in the hyperlink dialog box. Then select the bookmark's name from the drop-down list.
(Hyperlink) button and select Bookmark as the Link Type in the hyperlink dialog box. Then select the bookmark's name from the drop-down list.
|
|
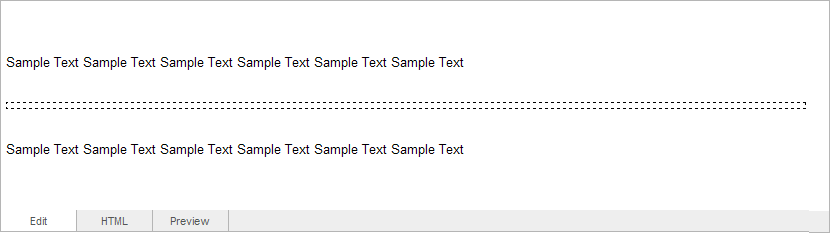
Insert a horizontal line at the location where the cursor is. The width of the horizontal line is the same as the width of the window.
You can use a horizontal rule to separate sections of a document.
|
|
You can insert images and adjust their size, location, alignment, etc. CrossEditor supports GIF, JPEG, PNG and BMP image formats.
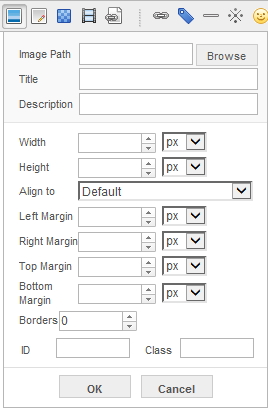
Image Path
Enter the image's file path. You can click the button and select an image in the dialog box.
Title
Enter the image's title. The contents of the field will appear when the mouse is placed over the image in a web browser.
Description
Enter a brief description as alternate text for the image. This text will appear when the image cannot be displayed.
![]() If the Administrator sets the Accessibility options to Level 1 or Level 2, the user must enter text in the Description field.
If the Administrator sets the Accessibility options to Level 1 or Level 2, the user must enter text in the Description field.
Width, Height
Set the height and width of the image in terms of pixels.
![]() You can also click and drag the image's resize handles to freely adjust the size of the image.
You can also click and drag the image's resize handles to freely adjust the size of the image.
Only Internet Explorer and Firefox support resized images.
Align To
Set the alignment of the image to the surrounding text. The alignment values are as follows.
|
Default |
Top |
Middle |
|
|
|
|
|
Bottom |
Left |
Right |
|
|
|
|
|
Top of Text |
Bottom of Text |
|
|
|
|
 Aligns the image to the baseline of the text
Left Margin, Right Margin, Top Margin, Bottom Margin
Set the left, right, top and bottom margins. The margins are the empty space surrounding the image.
Borders
Set the thickness of the image borders.
|
|
Insert an image which appears in the background of the document. You can set the image to repeat in the manner of tiles so that it covers the entire background regardless of its size.
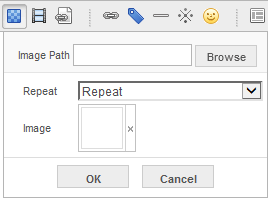
Image Path
Enter the file path to the background image. You can click and select an image in the dialog box which appears.
Repeat
Choose whether or not the image should repeat.
Repeat: Image repeats both horizontally and vertically.
Repeat Horizontally: Image repeats only horizontally.
Repeat Vertically: Image repeats only vertically.
No Repeat: Image does not repeat.
Image
Here, you can select from background images which have been previously used. Click the X next to an image to remove it.
|
|
Insert a video in the document. You can insert videos from your local disk or from the internet. When you insert a video, an image placeholder appears in the editing window.
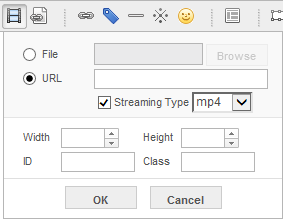
File
Enter the path to the video file. Click the Browse button to open a dialog box where you can choose a file.
URL
Enter the URL address for a video that is on the internet.
Streaming
If you have inserted a video from the internet and the streaming type is not specified in the URL, check the checkbox and use the drop-down list to set the streaming type.
Width, Height
Set the height and width of the screen where the video will play.
![]() If you insert a video from the internet, you must check if the video's file extension is included in the URL. If it is not, check the Streaming box and select a streaming type.
If you insert a video from the internet, you must check if the video's file extension is included in the URL. If it is not, check the Streaming box and select a streaming type.
![]() You can click and drag the video's resize handles to adjust the size of the video screen.
You can click and drag the video's resize handles to adjust the size of the video screen.
Only Internet Explorer and Firefox support resized videos.
![]() To facilitate crossbrowser support, videos are inserted with the HTML <embed> tag.
To facilitate crossbrowser support, videos are inserted with the HTML <embed> tag.
|
|
Insert a file of any type in the document.
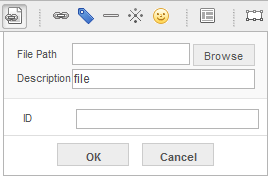
File Path
Enter the file path. Click the Browse button to open a dialog box where you can choose a file.
Description
Enter a description of the inserted file.
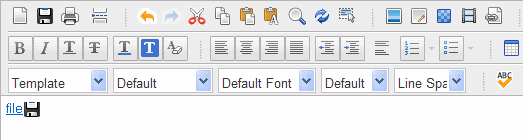
The location where the file was inserted is indicated as shown below.
|
|
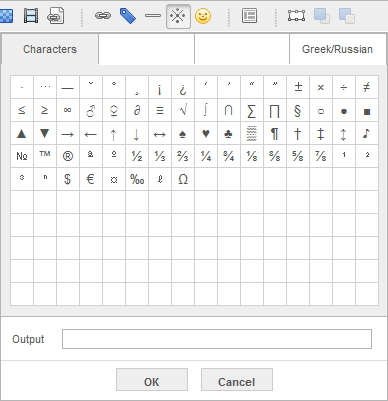
Insert characters and symbols which cannot be inserted normally by the keyboard. You can choose from several categories of symbols.
Click on a symbol and it will appear in the box. Click to insert the symbols in the document.
|
|
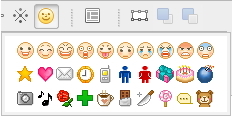
Provides a variety of emoticons.
Click the emoticon icon to see a panel with a selection of emoticons. Click on an emoticon to insert it into the document.
|
|
CrossEditor provides a variety of document layouts which arrange the document's text, images, etc.
Simply select the layout you want and click OK to insert it in the document.

|
|
Insert a layer which allows you to position text or images in a certain location.

Width, Height
Enter the width and height of the layer in pixels.
Position
Set how the layer is positioned.
Absolute: Position the layer without regard to the position of document text or other objects.
Relative: Position the layer relative to the position of document text or other objects.
|
|
Insert a page break which separates one page of the document from the next.
To insert a page break, click the ![]() (Page Break) button on the toolbar. A page break will be inserted at the current location of the cursor.
(Page Break) button on the toolbar. A page break will be inserted at the current location of the cursor.
Page breaks are used when printing documents.
|
|
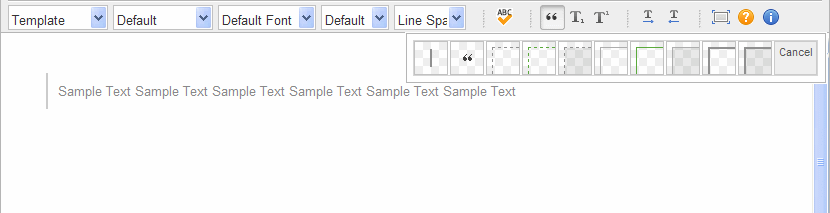
Set apart text as a block quote. A block quote is used when quoting other people at length.
To create a block quote, click the ![]() (Block Quote) button and select the quote format.
(Block Quote) button and select the quote format.
Then enter the text of the block quote.
![]() If you place the cursor in a paragraph and click the
If you place the cursor in a paragraph and click the ![]() (Block Quote) button, the text of the paragraph will be converted to a block quote.
(Block Quote) button, the text of the paragraph will be converted to a block quote.
|
|
You can select a template to create a document with the proper formatting.
To use a template, click the 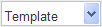 drop-down list and select an option.
Copyright © 2016. Namo Editor, Inc. All rights reserved.